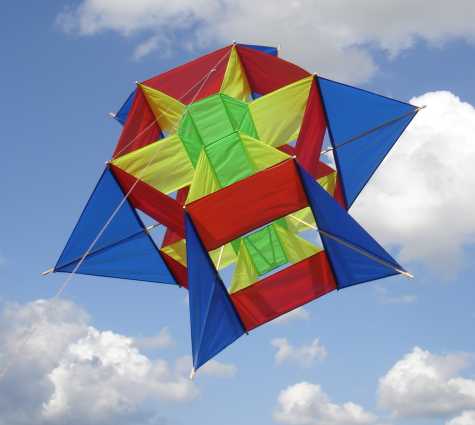
Waldof Box
 Invented
in 1977 by Peter Waldron of Worcestorshire, England, the Waldof Box
kite
is a spectacular sight in the sky and and the envy of onlookers. Whilst
certainly not a beginners kite to build, with a little time and care,
neither
is it very difficult. This model is 1.8m in diameter (6ft in round
numbers)
as this gives simple dimensions for the parts, but it can be scaled
up or down, adjusting spar thicknesses accordingly.
Invented
in 1977 by Peter Waldron of Worcestorshire, England, the Waldof Box
kite
is a spectacular sight in the sky and and the envy of onlookers. Whilst
certainly not a beginners kite to build, with a little time and care,
neither
is it very difficult. This model is 1.8m in diameter (6ft in round
numbers)
as this gives simple dimensions for the parts, but it can be scaled
up or down, adjusting spar thicknesses accordingly.
(Scroll down to the end for some photos people
have sent me.)
(My first prototype, built in 2000,
was half the length from front to back and never flew very well. Later,
I discovered the true proportions and adjusted these plans, but only
got around to rebuilding it in 2005.)
Outline
The sail is made up of four parts:
- Two inner boxes (green), each made of 6 panels 150mm x 300mm
- Two sets of 6 spokes (yellow), each 300mm square
- Two outer boxes (red), each made from 6 panels 450 x 300mm
- Six wings (blue), each with base 900mm and height 450mm.
In addition, there are:
- Six radial spars joined at the centre in a boss, and extending to
the
wing
tips
- Six longerons running the length of the base of each wing
Colours refer to the picture and diagrams; you can of course
choose any
colours you like, but I will continue to refer to my colour scheme for
clarity. Dimensions are finished dimensions, excluding hems
and
seams.
There are different grades of ripstop nylon. Be sure to use the
crinkley
sort, not the softer sort with a rubbery feel, sometimes sold as
"balloon
fabric", and used for soft kites. This has little resistance to
shearing
and so is unlikely to be successful. The quantities you will need,
assuming 1.5m wide fabric, and with a bit to spare, are:
- Inner boxes (green) 0.5m
- Spokes (yellow) 1.5m
- Outer boxes (red) 1.5m
- Wings (blue) 1.5m
The main radial spars are 8 or 12mm dowel,or 12mm fibreglass tube,
and the logerons are 8mm dowell. You will need 6m (3 x 2m lengths) for
the radial spars, and the same for the longerons.
Finally, you will need 20 - 25 hours and a fair amount of patience.
That may sound a lot, but with a couple of hours each evening, you can
do it in a couple of weeks. That's not many long Winter evenings, is it?
Sail Construction
To minimise boredom, alternate cutting out
with sewing. For instance, start by cutting out the inner box pieces,
then hem
their edges. Next, cut out and hem the spokes, and sew them into the
inner box. Hey, it's starting to take shape already, and it's only
Wednesday! In more detail...
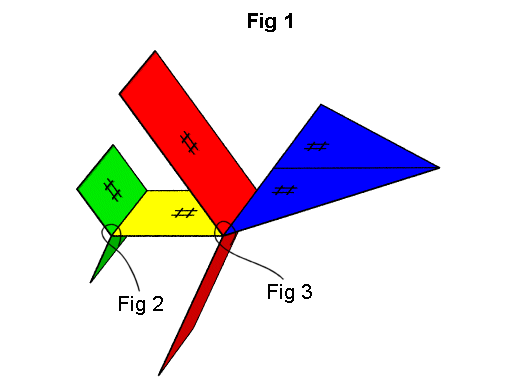 For those panel edges that are to
be sewn into other panels (figs 2 and 3), add 6mm seam allowance per
edge. For other edges,
cut to size and edge-bind using Anthony
Thyssen's method (or your own) All panels must have the grain
aligned
as shown by the #-marks in Fig 1. The wings should each be made out
of two pieces, with a hem lying under a radial spar using Peter
de Jong's method . Not only does the
hem give added strength against stretching, but this also allows better
utilisation of the fabric.
For those panel edges that are to
be sewn into other panels (figs 2 and 3), add 6mm seam allowance per
edge. For other edges,
cut to size and edge-bind using Anthony
Thyssen's method (or your own) All panels must have the grain
aligned
as shown by the #-marks in Fig 1. The wings should each be made out
of two pieces, with a hem lying under a radial spar using Peter
de Jong's method . Not only does the
hem give added strength against stretching, but this also allows better
utilisation of the fabric.
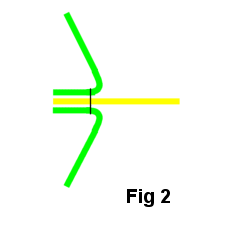
Construct
the inner boxes with the spokes sewn between the box sections, as shown
in Fig 2. Temporarily stick together three panels to be sewn, with
seamstick tape, about 15mm from the edge so that it doesn't gum up your
needle. Now sew them together 6mm from the combined
edge. If you can sew straight, you'll end up with a better kite. Remove
the seamstick tape. For the last seam, you will need to turn the box
inside out.
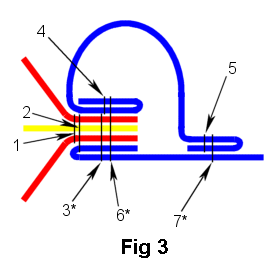
The outer box and wings are then attached to the spokes in a similar
manner, as shown in Fig 3. The numbers indicate the order of sewing.
(Ignore the blue loop over the top and numbers 4 - 7 for the
moment.) Asterisked numbers indicate lines of sewing where a zigzag
stitch is preferable.
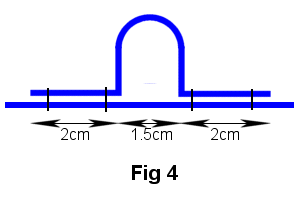
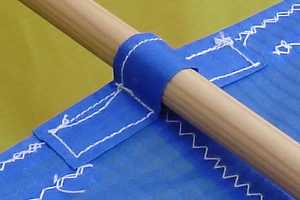
At the centre of the base of each wing, sew a strip of ripstop to
form
a loop through which a radial spar can pass, as shown in Fig 4. A piece
of ripstop 8x4cm
folded
into 3 to make a strip 8x1.3cm will do. Sew it to the wing, but
allowing
it to rise up in the centre, so allowing a spar to pass through, as
shown in Fig 4. (Dimensions are for 12mm dowel or fibreglass. Reduce by
about a third for 8mm.)
Two
tunnels must
now be sewn to the opposite side of the long edge of each wing, as also
shown in Fig 3 (the blue loops underneath), to house the longerons.
Each
can be made from a piece of ripstop 40cm x 5cm, which allows for a 6mm
hem on all edges before attaching it to the wing. Position them so
their
ends overlap the sewing of the loop for the radial spar on the other
side.
This gives extra strength to this edge against stretching where it
isn't
sewn into the outer box.
Radial Spars and Central boss
My prototype currently has 8mm
dowelling for the radial spars. If you generally experience smooth
winds, that may be sufficient, but you may still find it worth keeping
a spare radial spar with you. On a heavy landing, a wingtip will often
get knocked sideways (towards one adjacent wingtip and away from the
other) and may snap in the middle where it crosses the longeron. You
could run a taught line around all 6 wingtips, which should help quite
a lot, but you would probably be safer using 12mm dowelling. If you
prefer to use fibreglass, use 12mm tubing, which will be almost
indestructible. If you've got money to burn, use 8mm carbon tube. If
you use fibreglass (or carbon) you will have to devise your own method
of tensioning the sail. Should you decide to use carbon tube, get some
fibreglass rod which fits snugly inside. Cut 12 pieces, each a few cm
long, and glue one piece in each end of each radial spar, using epoxy
resin. Without this precaution, the carbon tube may split at the ends
where it is under greatest strain.
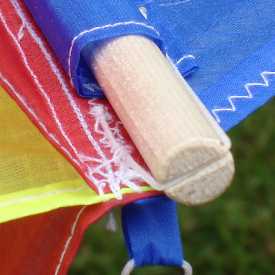
The 6 radial spars meet in the centre of the kite in a hexagonal boss,
for which there are several options. In the UK there is at least one
manufacturer of kite fittings which makes 6 and 8mm hex joiners, which
you should be able to get from kite stores for around £5
(probably special order).
If you make your own boss, will need to consider carefully what
materials you have available. Unreinforced wood will simply split as
soon as a gust strikes, but if you can find no alternative, strengthen
it with a large steel washer on each side and a bolt through the
middle. If you have access to the necessary machine tools, or know
someone who has, you can machine it out of a block of aluminium alloy.
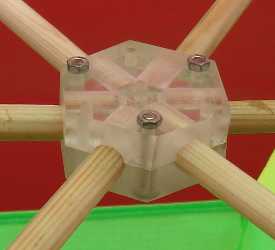
I
used 2cm acrylic (perspex) sheet (actually, two 1cm pieces bolted
together) as shown below left.
This is very strong and light. Nylon should do equally well. Cut a
hexagon, 4.5cm across the flats. In the centre of each of the
6 sides, drill an 8 or 12mm hole to a depth of 15mm. Below right is
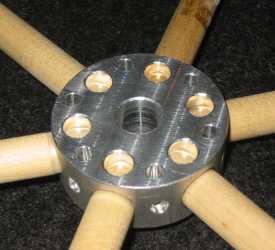
Buddy Randolph's boss, machined out of aluminium.
You may be able to make the boss out of fibreglass, using a kit sold
for repairing dents and rust holes in cars. (Note: I haven't tried
this, but I
have successfully used the technique to make ferrules to join two
lengths of dowelling.)
Cut six short lengths of 12mm dowelling and improvise some form of
clamp
to hold them accurately in position, just as the boss is to hold them,
like spokes of a wheel. Wrap two or
three
turns of greaseproof paper around the end of each, not too tightly.
Stick down the free end with double-sided tape. Apply some resin then
wrap glass
fibre around all six greaseproof-covered ends, dabbing more resin well
into
it. When the resin has almost set but is still not quite hard, unclamp
the dowels and carefully remove them, leaving the greaseproof paper
where it is. You won't have much time to do this; if you leave it a
minute or two too long, the dowells will be there for good. After a few
more minutes, you can build up another layer or two of fibreglass as
required. Leave it to set overnight, then tease out the greeseproof
paper, cut off rough ends with a hacksaw, and file down any protruding
sharp bits
of glass fibre.
Another possibility is a circular external frame as used in my
Snowflake kite, but you may not be able to
get the sail tight enough, and you may or may not think it looks as
nice.
Sail Tensioning
There are various methods of attaching the sail
to the spars, but mine involves sewing lengths of line directly
to the sail. My sewing machine has a foot with a groove on the
bottom to facilitate this. (You could get a spare foot and file a
groove in it.) Using a narrow zigzag stitch, you can sew alternate
stiches through and beside the line. Around 5cm of line stiched to the
sail in this way is quite strong.
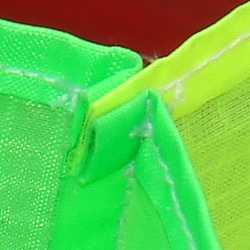
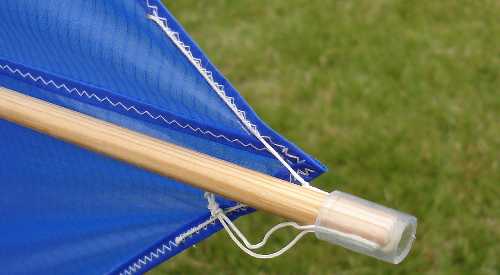
At one end of each longeron, sew a loop of line to the sail, and
cut a
groove in the end of the longeron itself, over which the line will
pass. (See the phoro accompanying Fig 3.) At the other end, sew just
one end of a length of line to the sail,
pass it over a groove on the end of the longeron, and secure it with a
short piece of PVC tubing which is a snug fit over the end of the
longeron.
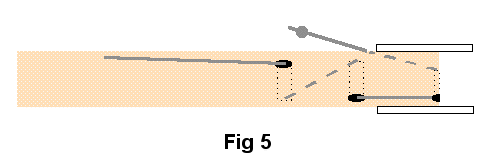
For the wingtips, sew a piece of line 10cm long to the wing,
with 5cm sewn down each edge from the tip, but not sewn actually at the
tip. Take a second piece of line, tie a loop in the end, and larks-head
it to the first at the wingtip.
Cut a groove in the end of each radial spar. If you need a stronger
hold, also drill two small holes through the spar near the end and at
right angles to each other (as shown in Fig 5, but not in the photo).
The second piece of line mentioned above is passed through the two
holes in turn (if used) and then over the
groove.
A small length of PVC tubing fitting snuggly over the end of the spar
will
now secure the line.
To tension the lines over the ends of the spars, tie a knot in the
end
of each. (The holes in the spar, if used, must be big enough for the
knot to pass
through.) Take another piece of line and tie a loop in each end.
Larks-head
one loop to a piece of broomhandle or similar, to act as a convenient
handle.
Larks-head the other loop to the line to be tensioned. The knot at the
end of it will stop the larks head from slipping off, and the piece of
broomhandle will make it easy to apply quite a lot of tension.
If you use fibreglass radial spars, fit a nock to the end. You can
either make a loop and adjust its length to get the correct tension, or
maybe tie several knots in it so you can choose one to get the tension
you want. Or you may be able to think of a better way.
Adjustment
On the first trial assembly you may find that either the inner or
the outer box is slack. Pinch the hem of one panel and adjust the size
of the pinch
until
that box is taught but the other hasn't started to go slack. Measure
the
length of the pinch and double it, to get the amount by which the
circumference of the
box must be reduced. Divide this by six, giving an amount, say, x
cm.
Now
at each seam as shown in Fig 2 or Fig 3, sew another line of stitching
x/3 mm from the first in the case of the inner box, or x mm in the case
of the outer. If x is a mm or less, you can divide the fold by 2 or 3
instead
of 6, and apply the correction to only 2 or 3 seams. On reassembly,
both
boxes should now be taught. If either box is noticeable irregular, or
one
edge is tighter than the other, you can improve or correct this in a
similar
way.
Bridling and Testing
I was never very happy with my original
bridle, attached to the front
ends of three non-adjacent longerons. A much
better method, as shown below, uses each end of two adjacent longerons
as the bridling
points. (This came from a photocopy someone sent me of
a few pages from a book in Italian, by Oliviero Olivieri - out of print
- and almost certainly reflects Peter Waldron's original.)
Cut four pieces of ripstop 6 x 2cm. Fold each in three, making it
6cm x 6mm approx, then double, making it 3cm long. Sew one to each end
of the bases of two adjacent wings to make the bridle attachment loops.
(One can be seen at the bottom of the photo next to Fig 3.) You may
like to add addtional loops to the rear ends of some or all of the
other wings, to attach streamers etc.
Cut two identical lengths of line, each about 150cm long. Using
bowline
knots, tie the two ends of the first length to the loops at the two
ends of one of the longerons. Repeat with the second, to the loops on
an adjacent longeron.
Hold the kite up to the wind by the two lines, with a finger in each
about 35cm from its attachment to the front end of its longeron. Find a
position where the kite seems to lift best. Attach a metal ring to each
line at these points, and adjust to ensure that each is the same
distance from the front end of its longeron.
Now attach a second length of line about 100cm long between the first
two two rings, and attach a third ring to it exactly in the middle.
Attach your flying line to this third ring, again using a lark's head.
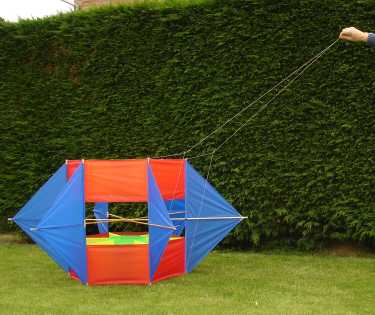
Launching is particularly easy with this bridle. Stand it on its
back as in the photo above and unwind some line. When you're ready, you
can simply pull it into the air.
All that remains, then, is to enjoy it, and bask in the admiration
of
onlookers! Below are photos of several that have been built to these
plans (or earlier versions of them).
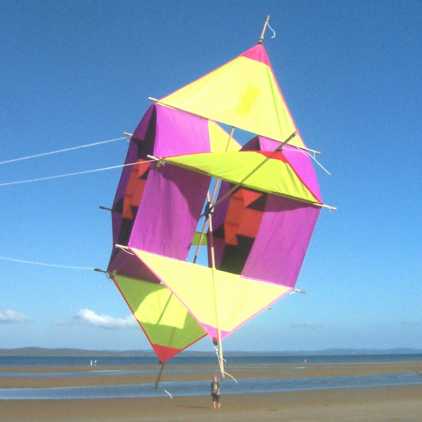
This is the maiden flight (May, 2005) of my second prototype (still
with the old-stile bridle).

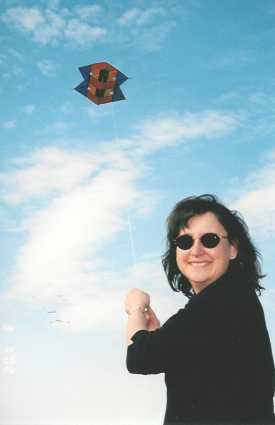
And again (new bridle, July 2005, kiteflyer's eye view), at a very high
angle on the end of 250' of line.
(Note that all the following photos show the previous, less successful
design of bridle.)
Another, built in 2005 by Lyndon Duncan of the Qeensland Kite Flyers
Association. Lyndon lives in Hervey Bay, 300km north of Brisbane.
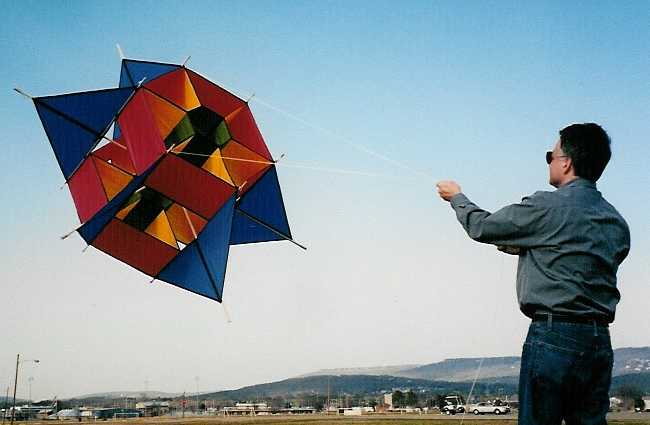
Buddy and Debbie Randolf of Huntsville, Alabama with the Waldorf they
built in 2002 to impress their 4 year old son. Debbie did all the
sewing, and Buddy, a NASA engineer, naturally directed operations.
If you've built a Waldorf to these plans, I'd be glad to add a photo
to the collection. And if you have an original by Peter Waldron, I
would be fascinated to see any photos, the more detailed the better.
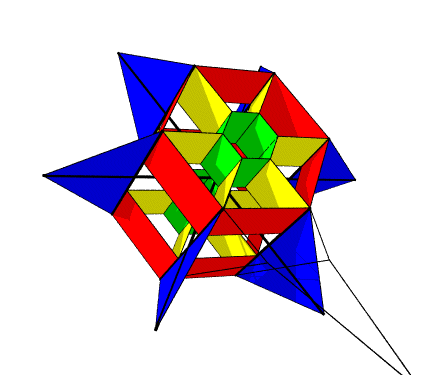
The graphic at the top of this page was generated using POV-Ray www.povray.org - model available on
request.
Back to the top.
Finally, a little
help never goes amiss. Usually.